CloudWatch Installation – Amazon Web Services
Installation Guide for EC2 instances running Windows Server
The below guide will take you through all steps for configuring CloudWatch on an EC2 instance, including any prerequisites and detailed steps.
- Route Verification
- IAM Role & User
- CloudWatch Installation
- Starting the service
Route Verification (Prerequisite)
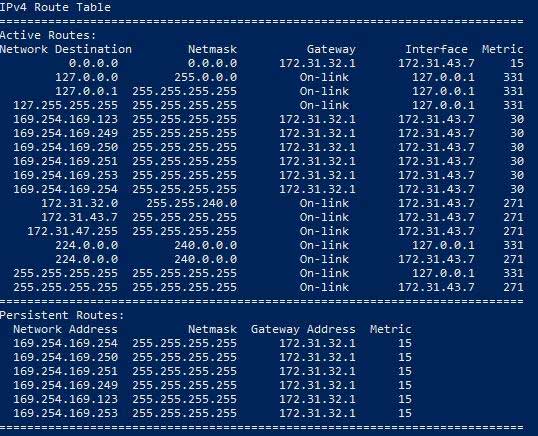
The CloudWatch agent relies on metadata from EC2, a service is automatically installed on the instance when it is created that allows this. The metadata is accessed via 169.254.169.254. A route is created on the server to map this address to the gateway, which on AWS can also change. See below.
You will need to confirm that the route matches the gateway, if it doesn’t you will need to update the route. To update the route, a PowerShell script is run at boot. However, if the gateway changes whilst the server is running, the routes will need to be recreated. This can be done by running the PowerShell script manually, as shown below.
Import-Module C:\ProgramData\Amazon\EC2-Windows\Launch\Module\Ec2Launch.psm1; Add-RoutesThe above PowerShell command recreates the routes and will resolve any issues regarding access to EC2 metadata.
IAM Role and User
The first step is to create an IAM Role, and an IAM user. They will both need permissions policies for ‘CloudWatchAgentServerPolicy’ and ‘AmazonSSMManagedInstanceCore’.
Creating the role
Begin the role creation from here: https://console.aws.amazon.com/iam/home#/roles
- Click on ‘Create role’. On the first page, select the type of trusted entity as ‘AWS Service’
and select the use case as ‘EC2’. Then click ‘Next: Permissions’. - This is where we select the permissions policies, search for both:
– CloudWatchAgentServerPolicy
– AmazonSSMManagedInstanceCore - Click ‘Next’ until you reach the final page, name your role and create the role.
Creating the user
Begin the role creation from here: https://console.aws.amazon.com/iam/home#/roles
- Click on ‘Create role’. On the first page, select the type of trusted entity as ‘AWS Service’
and select the use case as ‘EC2’. Then click ‘Next: Permissions’. - This is where we select the permissions policies, search for both:
– CloudWatchAgentServerPolicy
– AmazonSSMManagedInstanceCore - Click ‘Next’ until you reach the final page, name your role and create the role.
Attach IAM Role to EC2 Instance
The IAM role that you have created needs to be applied to your EC2 instance for the permissions to apply correctly.
- In your AWS EC2 Management Console, select the instance.
- Click the ‘Actions’ tab in the top right-hand corner, then Security -> Modify IAM Role.
- Select the IAM role that you have just created.
- Repeat steps 1-3 for all servers that need CloudWatch.


